Hello Again…

pic_additional_03 (1)
Neil Diamond’s song ‘Hello Again’ from the Jazz Singer film is an expression of enduring love – a need to keep restating loving emotions.  My relationship with the Fujifilm X100 series is more of an on/off love affair – an itch I can’t stop scratching, and here we are again…

I bought my first X100 camera, an X100S (’S’ for 2nd generation) back in 2014, largely as a result of seeing Todd Gipstein’s wonderful 1 Mile, 1 Year, 1 Lens video presentation. His 15 minute monochrome picture show was, as the title suggests, a series of photos all taken within the space of a year, and within a mile of his home. I suppose I thought that with a camera like that, I should be able to shoot great photos, unencumbered by lenses and filters and stuff – what I may just have missed is that Todd is a brilliant photographer, and the location for his photo set is the very varied and photogenic New England coastline…

X1009881

X100S – Poppies, London

Nevertheless, even with my much lesser talent, I did take some photos I was pleased with, and it was a very portable option when I wanted to travel light.  I kept the camera for about a year, then let it go when I wanted to get a wider range of lenses for my then Fuji X-T1. After about 6 months, I really missed that little camera’s portability and relative simplicity, so picked up what was then the latest 3rd generation X100T. Looking back, I see I only kept it for a couple of months – I had in mind that having a second body that I could fit my lenses to was going to be more useful than a fixed lens camera, so it got traded in.

DSCF1501

Colwyn Bay – X100F launch day

Fast forward a year or so, and all the Fuji gear had gone, and been replaced with Olympus – a mistaken belief that I could get similar image quality from a smaller camera and lens collection. I got talked into going to the launch event for the new 4th generation X100F in early 2017, and although I rather liked it, wasn’t really tempted to spend the £1200 or so it was priced at. Then in 2018, having dumped most of the Olympus kit in favour of Sony, I borrowed an X100F for a family holiday in France – I was still looking for the best possible quality in a camera smaller than my Sony A7iii with it’s rather large lenses. The X100F was marginally better than the Olympus Pen-F I still had, but rather than get the X100F, I went with the nearest Sony equivalent, an A6300 with a couple of lenses – logic being that these Sony lenses and bodies were all interchangeable up to a point.

DSCF1052

X100F – Ibiza

And that’s more or less where I was until a few weeks back when I realised that this search for a ‘perfect’ setup of larger camera for landscapes and ‘serious’ photography, and a smaller more portable system for travel was taking away all the enjoyment I was getting from photography – I was acquiring more and more gear, and then stressing about what to take with me (my previous blog post highlights this…) I was definitely heading for a complete photographic meltdown and it really was time to get a grip…

So decision made, and hopefully one I will stick with – I’ve slimmed down the Sony A7iii kit to the minimum, and will be keeping that just for landscapes etc, and particularly for locations where I am close to the car – it all still weighs a fair bit!  The A6300 and lenses has gone now, and in its place is (you’ve guessed it) an X100F!  Nearly new, it came at a good price, and is complete with filter adapter and a rather nice leather case. With a couple of spare batteries and a polarising filter, it’s a great everyday/travel option.

100F1223

X100F – Shrewsbury

I took it to Ibiza last week (and left the A7iii at home) and was more than happy with it. It’s definitely portable, and the results are very good indeed. I’m getting back into shooting mono and street photography, and really enjoying it – who knows I may yet sell the Sony full frame system and indeed revert to being a ‘one camera, one lens’ guy – not so much a ‘photographer’, more a ‘man with a camera’.

That’s quite an appealing thought!


Looking Back…

As we approach the end of 2018, I’ve been looking back over my photography and also picked a few of my favourite photos from this year.

EM120981_DxO-Edit

Perch Rock – E-M1ii & 12-40mm

I started the year with a couple of Olympus cameras – a Pen-F, and an OMD E-M1ii – both excellent cameras with amazing features.  The E-M1ii was probably the best-handling camera I’ve ever used, and the arsenal of lenses I had acquired over the previous year or so were all excellent. Despite this, somehow the results I was getting didn’t really make me happy.  I tried every which way to get the result I wanted, but there was always something that didn’t quite work for me.

EM120965_DxO

Loch Lomond – E-M1ii & 12-100mm

I’d tried a Sony A7Rii previously, and although I liked the image quality, I just wasn’t sure about going back to a full frame camera with it’s bigger lenses etc;  one of the things that attracted me to the Olympus had been it’s compact size and much lighter weight. When the new A7iii came out with it’s superb image quality and better handling, auto focus, viewfinder and battery life than the ‘old’ models, a change was inevitable… I realised that convenience was never going to be a match for image quality.

A7301365

Ramshaw Rocks – Sony A7iii & 16-35mm

Rather than risk the uncertainties of eBay, I sold all my Olympus gear to mpb.com – not the absolute best prices, but fair enough, and of course a risk free and speedy transaction. This bought me an A7iii body and a couple of decent prime lenses, to which I’ve added the superb 24-105mm ‘everyday’ zoom, and the super wide 16-35mm f4 Zeiss lens. I’m certainly happy with what this camera can do – the RAW files are truly amazing, and there is no significant image degradation even with fairly heavy post-processing. (By contrast, the Olympus files would ‘break up’ under even modest processing, with nasty artefacts and excessive noise.) No such problem with the Sony camera.

A7301985

Double Trouble – Sony A7iii & 55mm

To be fair, I haven’t used the camera to it’s full potential – in fact I haven’t used it a lot as yet, but every photo I have taken with it so far has exceeded my expectations. The images (especially those taken with the prime lenses) are razor sharp, and the massive 15 stop dynamic range means that shadows can be recovered in post-processing without creating excessive noise. So much so that I think I’ve only once needed to use my graduated filters – I’m seriously thinking of abandoning them altogether, which is a fair weight saving when walking.

A6301152

Lichfield Cathedral – Sony A6300 & 20mm

I did dally with a Sony A6300 for a while – I figured it would give me an additional more portable option than the A7 kit, and at a pinch would do as a backup body, but it just complicated matters.  The image quality, although great, just wasn’t quite as good, and I found myself always wondering which camera to take when I went out, so in the end let it go. Too many complications! Just having one ‘proper’ camera makes life much simpler…

With the improvements over the last few years in the cameras in smartphones, they are at last a viable alternative to a dedicated camera for everyday use (holidays, walking, family occasions etc). So when the A6300 kit went, I got myself a new iPhone XR, and haven’t looked back – for social media posts and general family photos it’s plenty good enough, and of course it’s with me all the time. I’ve just acquired a wide angle lens for it, and that opens up more photo options. Telephoto lens next maybe?

A7301871

Plas Power Woods, Wrexham – Sony A7iii & 24-105mm 

So what does 2019 have in store?  Well, I’m certainly planning to get out more with my Sony camera – I’ve already booked to go on a couple of one-day events – not so much photo workshops as ‘opportunity days’ – the chance to shoot subjects that wouldn’t otherwise be as easy to access.  I’ve realised that I don’t really get much from traditional group photo workshops; they tend to be quite expensive, and with up to 12-14 attendees it can be rather limiting – all standing in line to take the same shot. So I’ll mostly be going it alone…

moment_photo_DB0022F2

Peatswood – iPhone XR & Moment w/a lens

I’m also super-excited about using my smartphone for ‘off the cuff’ photography – there are so many photo opportunities in everyday life, and having a half-decent camera with you all the time is definitely the way to go.  This photo was taken on my iPhone while on a family walk, and entirely processed using Lightroom Mobile & Snapseed on the phone itself.   It obviously takes longer to ‘process’ a RAW image from the phone than it does to use the standard JPG file that phones capture by default, but it really does open up some interesting possibilities.

I don’t think I will ever give up having a ‘real’ camera, but who knows!

Back to the 1950’s…


A7301756Thanks to those kind people at Olympus and London Camera Exchange, I spent a very enjoyable day last week at the Llangollen Railway. Even though I don’t presently have an Olympus camera, that was no barrier, and it was good to spend a day with like-minded ‘togs exploring the photo opportunities around this lovely heritage railway.

Not only did we get to travel the length of the line through the beautiful Dee Valley in a superb steam hauled train, but also had access to one of the still-working signal boxes and a tour of the railway workshops. Remarkable what this largely volunteer supported railway charity has achieved – not only bringing back to life a section of railway that closed to passengers in 1965, but recreating many of the original buildings and structures that had been demolished. A7301704The line now runs for around 10 miles from the beautiful station at Llangollen, via Berwyn and Carrog to Corwen. Not only have the railway workshops rebuilt and maintained locomotives and rolling stock for the railway, but they are building new locomotives for their own use and on behalf of other heritage railways around the UK.

In addition to a year-round regular timetable, they run special events such as Santa Specials, and even host weddings – a wedding party were using the train for a reception when we visited.

Rather than be weighed down by my full photo kit, I traveled fairly light with just my Sony A7iii camera body, and 35mm and 55mm lenses. The lack of zoom flexibility was more than repaid by the opportunity to take some wide-aperture shallow depth of field shots.  I’ve a few shots I’m very pleased with, and will definitely be returning! Here are a few more photos from the day – all suitably ‘retro’ processed to reflect the ambience of this delightful venue…

This slideshow requires JavaScript.

Here we go again…

A7300160

Daisy-Mae 85mm f1.8

There were so many things I loved about my two Olympus cameras, but ultimately I just didn’t find the overall image quality satisfying. The Pen-F was retro-chic, and had knock-out features like keystone correction, and Livetime mode (great for long exposures), and with smaller prime lenses gave me real portability.  The E-M1ii added pro-quality construction and ergonomics, Pro-capture for fast moving action, blazingly fast AF, and battery life that rivalled good old DSLR cameras.

Without doubt these cameras are superb for sport and wildlife (because the 2x crop factor brings subjects in that much closer) and there is a great array of compact and reasonably priced lenses available.  Sadly only the c. £1k Pro lenses make the best of the cameras (and these lenses are no longer small!) but even then, for me, images just didn’t have the ‘punch’ or saturation of cameras with larger sensors.  In poor light, or high contrast subjects where recovering detail from shadows is needed, they really fall down.

A7300161

Sony 85mm f1.8

So, even though it means going back to a larger, heavier setup and foregoing some of those unique Olympus features, the whole kit has gone, and the new kid on the block is a Sony A7iii. Resolution at 24mpx is a little higher, but this is a full frame camera so a sensor four times the size, and that really shows in image quality.  I can’t say I care for the Sony ergonomics – the body has lots of squared off corners – it just isn’t as ‘organic’ as the E-M1ii, and the button and menu layout aren’t exactly intuitive, but it does have great battery life, and the AF is ‘good enough’ for what I want. From all accounts its not as well weather sealed as the E-M1ii so I definitely won’t be taking it out in the rain!

tropic 180630

Sony 28-70mm ‘kit’ lens

Although my camera came with a fairly basic ‘kit’ zoom lens (it was the only way to get it quickly) my plan is to just use this for ‘walkabout’ or casual shooting, and get prime lenses for anything ’serious’. I’ve made a conscious decision to use just prime lenses with a limited range of focal lengths rather than wide-ranging zoom lenses – I’m hoping that rather than limit what I can shoot, it will actually enhance my creativity.  Without doubt it will mean sharper and crisper images – something of a holy grail for me.

A7300173

Sony 85mm f1.8

So far, in addition to that ‘cheapo’ everyday zoom, I’ve picked up the 85mm f1.8 Sony FE medium telephoto lens, a general purpose 35mm f2.8 Sony Zeiss lens, and a Zeiss Batis 25mm f2.8 wide angle. This latter lens was one I tried a few months ago at a Sony event, and the sharpness and contrast blew me away.  Still on the shopping list is a Sony Zeiss 55mm f1.8, but that is waiting for more funds!

All is looking good so far, and these are just a few photos I’ve taken in the week or so I’ve had the camera. Watch this space!

Pen-F does Keystone Compensation

Screenshot 2018-05-28 06.27.17

Image without correction – note how the room is distorted

Funny isn’t it, how our brain interprets what we see, but a photograph needs some help? When we look upwards at a tall building, the top is further away than the bottom, so appears smaller, but our brain compensates for this, and it all looks ok.  Take a photo of the same scene, with the camera tilted upwards, and in the 2D view we see, the building looks like it is toppling backwards – our brain only sees what is in the photo, not what it ‘wants’ to see.  This is called ‘keystoning’ and even a slight camera angle will show this effect. It’s the same in the horizontal plane too if we take a photo where the right or left of the scene is further away than the other. It’s even more ‘odd’ if the camera is pointing slightly downwards, as shown in this example.

Screenshot 2018-05-28 06.23.16

Image corrected but not cropped

Photo processing software like Lightroom has a tool for ‘correcting’ this keystone effect – it ‘bends’ the image so the verticals appear upright, and all looks natural again. It works pretty well, but you then need to ‘crop’ or trim the image to remove the white space at the corners, and so you lose some of what you photographed at the extreme edges. Specialist lenses have been available for years that can deal with this effect in camera, but they are hugely expensive, and pretty tricky to use.

Screenshot 2018-05-28 06.26.00

Image corrected and cropped in Lightroom

Enter the Pen-F with its ‘keystone compensation’ feature.  Activate this, and you can actually then do the compensation when you take the photo, so ‘what you see is what you get’ afterwards. Hold the camera to get the angle and composition you want, and twiddle the rear control knob until the verticals line up, and press the shutter button.  It takes a second or so to process, but then ‘voila’ – there is the corrected image on the screen. Its a bit easier to do if the camera is on a tripod as you can more readily make fine adjustments, and the camera only produces a keystone-corrected JPG image rather than RAW file.

OLYMPUS DIGITAL CAMERA

JPG image corrected in camera, with minor adjustments in Lightroom

So maybe the image quality isn’t as good as shooting an uncorrected RAW file and correcting it afterwards in Lightroom, but if space is tight, you don’t want to risk losing a critical bit of the photo when processing. Going back and shooting the shot again isn’t always an option. Also, the time saved can be better used to make some final ‘tweaks’ or adjustments to enhance the image.

For shooting architecture etc, this is a ‘killer’ feature, and currently unique to the Olympus OM-D and Pen-F cameras.

Olympus does Motor Sport….

OLYMPUS DIGITAL CAMERAAlthough I have some reservations about using my Olympus Micro-Four Thirds (MFT) cameras for landscapes, one area where they come into their own is fast action photography like motor sports. The sensor on all MFT cameras is just one quarter the size of a so-called full frame camera, and although they can still deliver file sizes based on up to 20Mpx, the individual pixels are so-much smaller, so suffer from noise in low light or high contrast situations and this does limit things somewhat, in my opinion. MFT cameras do have a couple of particular advantages though, especially for action photography – the small sensor means that a given focal length lens is equivalent to a lens twice as ‘long’ as one fitted to a full frame camera, and for any given aperture will have a much greater depth of focus. So, in practical terms, the same ‘spec’ lens on an MFT camera will bring things in much closer, and more of the subject will be in focus.

OLYMPUS DIGITAL CAMERAMy camera, the Olympus E-M1 mk2, has one other killer feature – ProCapture. Whereas most cameras will focus on the subject when you half press the shutter, and then take one or more photos when you fully press it, Pro Capture starts recording as SOON as you half press the shutter, and ‘buffers’ or keeps the last 12 shots in its memory together with all those after you press the shutter, and these are then written to the memory card. So if you are shooting at one of the lower speeds, like 5 frames a second, you will get a couple of seconds worth of images BEFORE you make that final press of the shutter.  How many times have we been looking through the viewfinder waiting for action to happen, like a bird taking off, but by the time we react to the movement, the bird has gone. This camera lets you go back in time!

OLYMPUS DIGITAL CAMERASo last weekend I spent some time at a club motor race meeting at Oulton Park in Cheshire with those nice folks from Olympus UK Events. I already had my E-M1ii of course but was pleased to try both a 40-150mm Pro lens, and the 300mm f4 Pro lens (they were loaning out cameras too if anyone wanted to try those). A great opportunity to ‘try before you buy’ given that the 300mm lens is around £2000 to buy. Also on hand to help were Lewis Speight, one of the technical gurus from Olympus UK, and Mike Inkley, a pro sports photographer. So off we went trackside to record the cars that were racing that day – some modern sports/touring cars, but some classic sports cars too.

OLYMPUS DIGITAL CAMERA
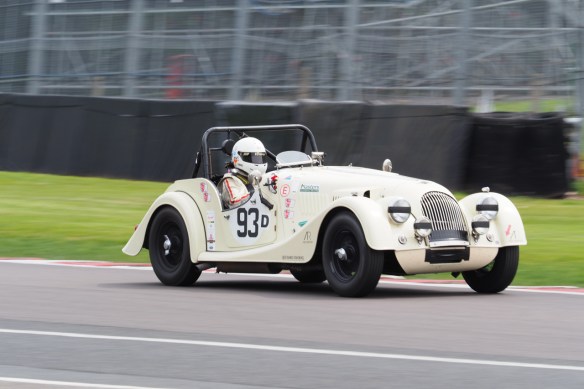
Lets just say that the equipment we were using was amazing – the ability to fill the frame and focus on fast moving cars from the other side of the safety barrier, and record bursts of up to 40 shots as the cars went past or crested the top of the hill at Lodge Corner!  I did however fill a complete memory card during my morning session – over 3000 images – so needless to say sorting through these and picking the best from each sequence took some time!

Suffice it to say, I would thoroughly recommend this setup for sport photography…

Coast and City…

OLYMPUS DIGITAL CAMERA

Perch Rock Lighthouse

Last week I had the opportunity to spend a few spare hours in the Liverpool area, so decided to check out the lighthouse at Perch Rock, New Brighton. This lighthouse has stood at the mouth of the River Mersey since 1830 and was only decommissioned in 1973. I misjudged the tides, and with the tide almost fully in when I got there, I wasn’t able to walk out to the lighthouse itself, but had to be content with taking photos from the edge of the promenade.  A stiff breeze meant there were waves 3-4 ft high, so it very much suited a long exposure treatment. Locking down the ISO to 64, and using a 10 stop filter gave me a decently long exposure, and I was pretty pleased overall with the result.

OLYMPUS DIGITAL CAMERA

Tate Liverpool

From here I used the Wallasey Tunnel to ‘pop’ into Liverpool and spent an hour or so around the Albert Dock area. I’ve taken photos before of the hundreds of padlocks affixed to the railings on the edge of the dock, but there are now so many its virtually impossible to get a ‘clean’ shot of the padlocks.  However the railings around the entrance to the Merseyside Maritime Museum were nicely lit by the afternoon sun, and made a good ‘frame’ for the sign outside the Liverpool Tate Museum. A wide-ish aperture softened the lettering on the sign, and created some useful separation.

OLYMPUS DIGITAL CAMERA

Museum of Liverpool

With construction work going on, there are barriers up all around the iconic front elevation of the Museum of Liverpool just now, so I had to be happy with a reflection of the The Three Graces in the picture windows at the end of the building.

Given that I only had a couple of hours altogether, and was ‘traveling light’ with just one lens (12-40mm on my Olympus E-M1ii) and a couple of round filters I was pleased with the results from the afternoon.

North Coast 500 Adventure – Part 3

Achmelvich Beach

Achmelvich Beach

Our next couple of days were spent exploring the beaches, lochs and hills around Lochinver – part of the ‘official’ NC500 route, but definitely not recommended for larger camper vans! Some of the nicest scenery we saw all trip here…  Just outside Lochinver, Achmelvich is well signposted, and like all the beaches we visited, has good free parking and easy accessibility down to the beach. Truly beautiful and the whitest sand you will see on any beach in the UK, with rocks and cliffs to explore and get a higher viewpoint.  From here it was just a few miles further on to Clachtoll beach – just off the road, and with a camping and caravan site close by.  Despite that, at 11am we were the only people on the beach!

Stoer Lighthouse
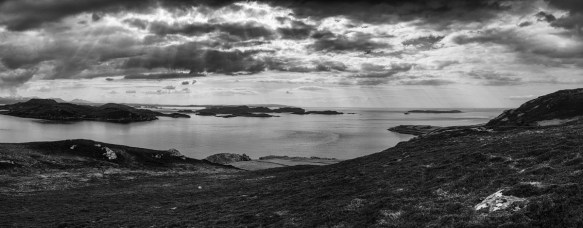
We next took a lengthy diversion to the lighthouse near Stoer Point – more great views and the option to walk the 2 miles to Stoer Point for the more adventurous. Very rural around here – lots of derelict farmhouses and agricultural machinery, and one (working) smallholding had a dead fox hung up on the fence by the house! Needless to say we didn’t hang around here for long… 

Secret Tea GardenGetting peckish by then we were on the lookout for a nice spot for our picnic lunch (ordered from the hotel the night previous) and found yet another glorious beach, just by the side of the road at Clashnessie.  Just a few steps down onto the beach, spread out the picnic blanket on the white sand, nicely sheltered from the wind by the sand dunes and we were made up!  Like most of our trip, the weather was again dry, and it was great to feel the sun on our faces. Come mid-afternoon, we found ourselves in the village of Drumbeg – great views again out to sea, and we found a quirky little spot for an afternoon cuppa – the Secret Tea Garden. With a delightful little patio seating area, and home made cakes, what’s not to like! Just worth noting – the place doesn’t have a loo, so best stop at the public facilities at the viewpoint in Drumbeg Village just up the road… 

Ardvreck Castle

Ardvreck Castle

More very narrow and steep roads took us back to the main road near Unapool, and back via the shores of Loch Assynt to our hotel. After this very hectic and actually quite tiring day, we were glad to spend the next day checking out the beaches again!

Our next stop on our way north was Ardvreck Castle – just a ruin now, but superbly positioned overlooking Loch Assynt – definitely worth exploring and a good spot for photos.  On then to Kylesku, and its beautiful curved bridge. Kylesku Bridge
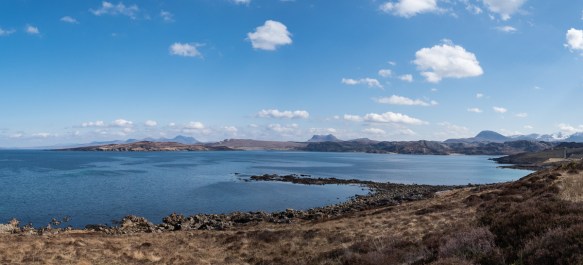
From here it’s up to Scourie, and although the beach was ‘so-so’, the rocky headland was well worth exploring and we saw many different sea birds.  Earlier in the trip, some friendly visitors we got talking to had recommended we find the beach at Oldshoremore, just outside Kinlochbervie, so that was our next stop.  Kinlochbervie itself was pretty unimpressive – just a working fishing port, but the beach we were looking for was awesome! With the tide out, it must have been a good 200 yards from sand dunes down to the sea, and I guess the beach was over a mile wide – again with rocky headlands at each end. During the hour or so we were there, we only saw 2 other people on the beach. Fair to say that the beaches in Scotland are truly superb!

Kyle of Tongue & Ben Loyal

Kyle of Tongue & Ben Loyal

A quick spot of lunch at The Old School restaurant near Kinlochbervie – a characterful place with good food and drink (and it has rooms too apparently), and back onto the main route towards the far north west. After several more stops to take in the views of lochs, sea and mountains, we decided to skip the detour to Cape Wrath, and press on to our next hotel. Stunning views all the way – my favourite view from this part of the trip was from the causeway over the Kyle of Tongue, looking across to Ben Loyal.

North Coast 500 Adventure – Part 2

Loch Maree Viewpoint

Loch Maree from Glen Docherty

After our hair-raising drive around the Applecross Peninsula, it was time for something a little more leisurely, so for our next day we didn’t stray far.  We started in the quant village of Kinlochewe, with its brightly painted cafe, and took the short diversion up to the viewpoint at Glen Docherty, which affords wonderful views over Loch Maree, the third largest loch in Scotland. Then we took the single track (main!) road a little further north along Loch Maree to the beautiful sandy beach at Gairloch – there’s easy parking by the church/cemetry and a boardwalk  down to the beach. What a wonderful beach!

Next up, we took a short diversion off the official NC500 route to Badachro as we had seen signs promising a decent pub for lunch. Although the views over the harbour from the pub lounge were great, and the bar had a good selection of drinks (including the local gin), sadly the food was a little disappointing and ‘mine host’ was rather overbearing!

After another night at our hotel, where we tried their rather less fancy and more reasonably priced Torridon 1887 Pub for dinner, it was on the road again. Next real place of interest was Loch Ewe, used in WW2 as the start point for many of the ill-fated North Atlantic convoys. Apart from the remains of some fortifications, there is currently a NATO refuelling depot there which rather spoils the view over the loch! Next along the route was Gruinard Bay, with its beautiful panoramic views out towards the Summer Isles, before a drive alongside the heavily wooded Little Loch Broom, across some spectacularly deserted moorland, before down to the sea again at Ullapool.

Gairloch Beach

Just another beach…

Rather than take the ‘official’ route straight up to Assynt and our next hotel at Lochinver, we elected to take ‘minor’ roads there (heck even the ‘major’ roads are often single track with passing places!) and what an afternoon it was. Passing the base of the impressive Stac Pollaidh (pron. Stack Polly) mountain, we reached Loch Oisgaig, another spot where the freshwater lochs virtually meet the sea, and a lovely little peninsula that directly overlooks the Summer Isles. More beautiful beaches and viewpoints around Polbain, some quite isolated properties (both old and new) but a wonderful sense of peace – if ever I go missing, you will know where to start looking for me!

OLYMPUS DIGITAL CAMERA

Summer Isles, from Polbain

To be honest, we could have stayed there forever, but our hotel, Inver Lodge, beckoned so on we went through beautiful Inverkirkaig and onto our base for the next couple of days.

Lochinver from Inver Lodge

Lochinver, from Inver Lodge

Built in 1986, this is definitely not the prettiest hotel you’ll find in Scotland (it looks more like a residential home or golf clubhouse!) but perched as it is on a hill above Lochinver, it has fabulous views over the harbour and surrounding area from every room and certainly delivers! We stayed for 3 nights (they frequently have a 3 for 2 offer on accommodation) and enjoyed great service and fabulous food – it has an ‘Albert Roux’ restaurant and we tried his signature Soufflé Suissesse starter – delicious, rather like ‘floating islands’, but with cheese sauce instead of cremé anglaise…  Another opportunity to try some local artisan gins too – looking at the selection on offer there will soon be as many Scottish gins available as whisky!

OLYMPUS DIGITAL CAMERA

Gruinard Bay and the Summer Isles

Here are a few more photos from this part of our trip…

North Coast 500 Adventure – Part 1

OLYMPUS DIGITAL CAMERA

Loch Lomond (in the rain)

Our first road trip for quite a while, and top of my bucket list, the North Coast 500 (NC500) is marketed as Scotland’s answer to US Route 66. Roughly 500 miles long, it starts and finishes in Inverness, and pretty much follows the coast road around Northern Scotland. Planned as a holiday rather than a photo trip, there was obviously going to be lots of photo opportunities, but not much time for considered and contemplative photography – right from the outset I figured it was going to be pretty much snapshots only. So, no filter systems, just my Olympus E-M1ii camera and 12-100mm ‘superzoom’ lens, and a Pen-F and 17mm as ‘backup’.

OLYMPUS DIGITAL CAMERA

Glenfinnan

Starting from home in Shropshire added another 250 miles each way to the start point, so it was more like a NC1000 for us! It all started in rather damp fashion, with a grim drive in the rain through the M6 roadworks in Cheshire. Fortunately the rain eased off after that and we got to our first overnight stop on Loch Lomond without incident, although the rain made another appearance. Staying in the excellent Lodge on Loch Lomond overnight, with the added bonus of a sauna in our (upgraded) room set us up for what turned out to be an eventful second day.

OLYMPUS DIGITAL CAMERA

Ferry Crossing

It started well enough, with a steady drive up through beautiful Glencoe, followed by a brief stop in Fort William to take in an exhibition of Scottish Landscape Photography.  All good stuff.  Then the plan unravelled – the swing bridge at Spean Bridge on the A82 had jammed in the open position, totally blocking the route northbound.  Rather than waiting until it was hopefully fixed, or taking a 90 mile diversion, we opted to cut across to Mallaig via Glennfinnan, and take the ferry to Skye, before crossing back to the mainland and working along the coast.  We had an anxious hour’s wait as the ferry was fully booked and we had to go standby!  Fortunately they squeezed us on, and we had a bracing 35 min journey across The Sound of Sleat to Ammandale, incidentally pretty much the only way to Skye before the Skye Bridge was opened in 1995. Not so lucky were the dozen or so cars in the queue behind us – they had wait for the next ferry 2 hours later… So it was then a straight drive to Broadford, and across the Skye bridge to pick up our original planned route – we were on Skye for just 25 minutes!

OLYMPUS DIGITAL CAMERA

The Torridon Hotel

After a further couple of hours driving on fairly twisty and narrow (sometimes single track) roads, it was a relief to get to our hotel in Torridon – straight into the bar for a well deserved gin and tonic! A decent enough gin selection, but nothing compared to the almost 400 whiskies on offer! A beautiful hotel, albeit at the top of our budget, but so full of Scottish style and charm.

Up bright and early next morning (more sunshine too!) for our first ‘serious’ part of the NC500 – the Applecross Peninsular, and the infamous Bealach Na Ba pass through the mountains.  Reaching just over 2000ft at its highest point, this is not a road for the faint-hearted, or for camper vans – one section is very narrow indeed, with a gradient of 1 in 4, a series of hairpin bends, and

OLYMPUS DIGITAL CAMERA

Start of Bealach Na Ba

very steep drops just beyond the crash barriers! However, the views are simply amazing, looking out across the hills towards Loch Carron in the south, and Skye and its outlying islands to the west. After a brief stop at the summit viewpoint to take in the vista, it was all the way down again into the quaint little village of Applecross with its beautiful, if rather stony beach.  A quick lunch at the excellent Applecross Inn and we were off again, along the coast road back towards Shieldaig.  More amazing scenery as we tracked along the coast – mountains to our right, and sea to the left, with Skye and its islands of Rassay and Rona in the distance. With so much to see, and so many places to stop off and admire the views, it took us a good couple of hours to make the return journey to the hotel.

OLYMPUS DIGITAL CAMERA
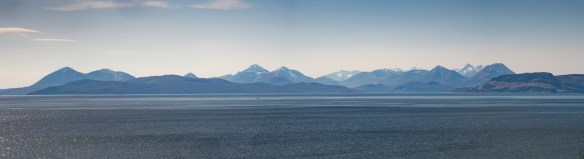
An amazing day, and one that completely surpassed our expectations. Roll on tomorrow, and Part 2!